
Are you ready to transform your business applications with the power of AI? Profound Logic’s newest innovation, Profound AI, is here to make that transformation seamless and effortless.
Here, we’ll walk you through the simple steps to install Profound AI, our gift to you, and start your journey toward AI-driven business solutions.
Profound AI Installation Walk-Through:
Step 1: Prepare Your Environment
Before diving into the installation process, ensure your target system meets the following requirements:
- A supported platform (IBM i, Windows, Mac or Linux)
- Node.js (version 18 or 20)
- NPM (Node Package Manager, usually bundled with Node.js)
For IBM i users, we recommend using the latest compatible version of Node.js available through IBM’s package manager.
Step 2: Download Profound Installer
To simplify the installation process, we’ve created the Profound Installer – a user-friendly GUI for Windows that takes the complexity out of managing Profound AI installations. Download the Profound Installer from our website: Download Profound AI.
Is your local computer not a Windows machine? Check out these step-by-step instructions on how to use the command line installation method on your target system. (BLOG WILL BE LINKED HERE)
Step 3: Launch Profound Installer
Once downloaded, launch the Profound Installer. It will automatically check for updates, ensuring you have the latest version to work with.
Step 4: Install a New Instance
- Click the “Install New Instance” button on the Instances panel.
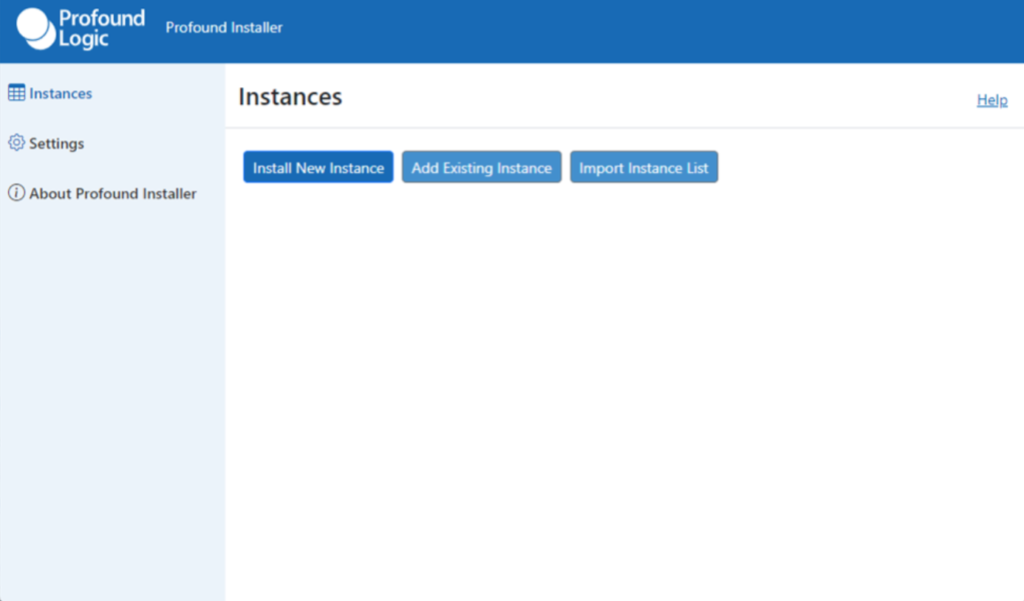
- Select “Profound AI” as your product.
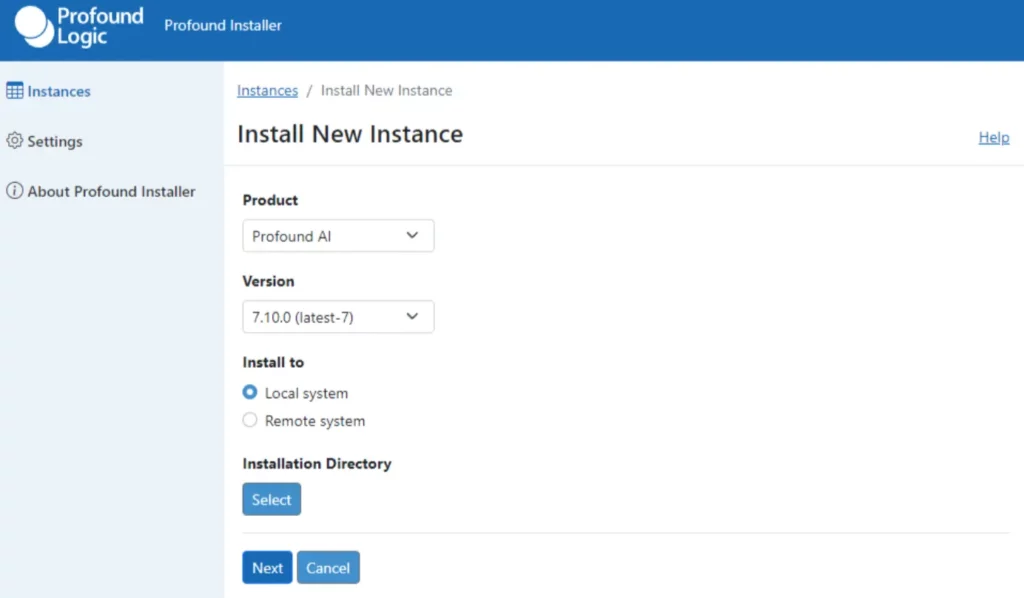
- Choose the desired version of Profound AI.
- Decide whether to install locally or on a remote system.
For local installations:
- Click “Select Installation Directory” and choose an empty directory for installation.
For remote installations:
- Enter the host name, user credentials, and installation directory.
- The SSH port is typically 22, but you can adjust if needed.
Step 5: Configure Your Installation
After selecting your installation options, you’ll be presented with a configuration panel. Here, you can customize various settings such as:
- Server port
- IBM i Connector Library (for IBM i installations)
- Node.js version
- AutoStart options
Don’t worry if you’re unsure about some options – our installer provides recommended defaults for most settings.
Step 6: Complete the Installation
Click “Install” to begin the process. Profound Installer will handle the rest, downloading necessary components and setting up Profound AI on your system.
Step 7: Getting a License Key
The final step is Applying License Keys for Profound AI. You can apply your Profound AI license key by visiting the following URL: http://system-name:port/key
Where system-name is the name of your own system and port is the port number that you used for your Profound AI instance. For example, if your system name is SYSTEM and your Profound AI instance is installed on port 8081, your URL would look like this: http://SYSTEM:8081/key.
If your Profound AI instance is running on your PC, use: http://localhost:8081/key
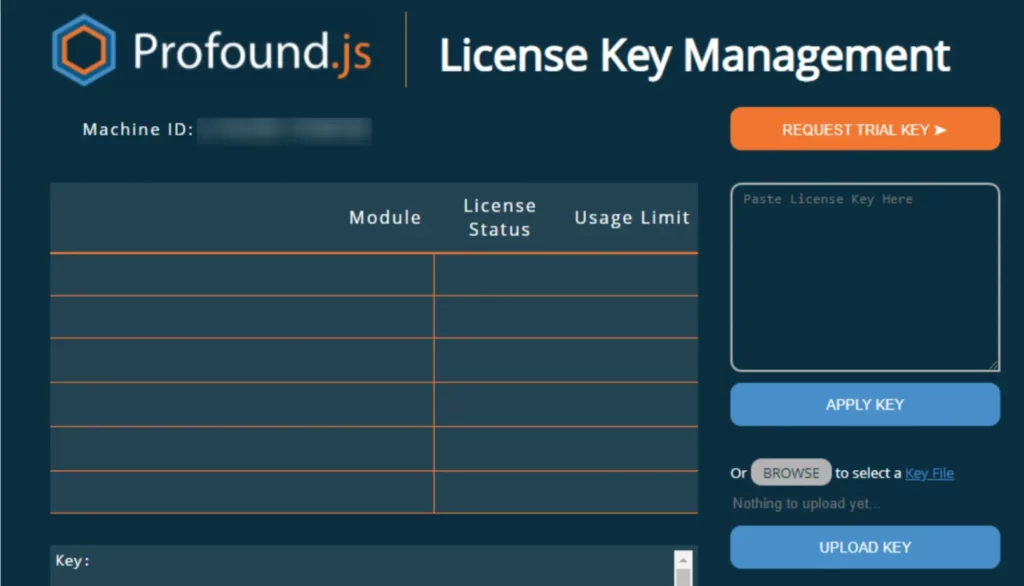
If you do not already have a license key for Profound.js, this screen gives you the option to request a trial key that will allow you to use a trial version of Profound.js before purchasing any licensing.
Once you have your license key, you can apply the key in one of two ways:
- You can copy and paste the key into the “Paste License Key Here” text area.
- You can upload the license key file from your local computer if you were sent a file that contains your new key.
Once you’ve pasted or uploaded the key, you will select the ‘Apply Key’ option. After applying the key, you can refresh the page to verify that the key was applied successfully. After the key is applied, you should see a list of modules that this key includes on this screen along with more details on the license status of the modules (i.e. whether you have a permanent or trial license for the modules listed, any usage limits, etc.).
How To Configure Your Models:
Now that you’ve successfully installed Profound AI, let’s talk about configuring your models. Profound AI offers incredible flexibility, allowing you to work with a variety of large language models to suit your specific needs.
- Locate Your Configuration File
- First, find your config.js file. This is where you’ll add or modify the “models” property to configure your preferred language models. This file will be in the directory where you installed Profound AI.
- Choose Your Models Profound AI supports a wide range of models, including:
- OpenAI models (like GPT-4 and GPT-3.5 Turbo)
- Google’s Gemini Pro
- Azure OpenAI models
- Anthropic’s Claude
- Mistral AI models
- Custom or open-source models
- Set Up Model Properties For each model, you’ll need to specify certain properties. Here’s a basic example:
- javascript Copy
models: {
  "GPT-4": {
    provider: "openai",
    model: "gpt-4",
    apiKey: "your-api-key-here",
    stream: true
  }
} - Key properties include:
- provider: Specifies the model provider (e.g., “openai”, “google”, “anthropic”)
- model: Identifies the specific model to use
- apiKey: Your authentication key for the API
- stream: Set to true if you want the model to stream its output
- Key properties include:
- Use Environment Variables for API Keys
- Create a file called “.env” and then put the API keys inside that file in the format shown.
- Copy
OPENAI_API_KEY=sk-your-key-here
- Then, in your config.js, reference the environment variable:
- javascript
- Copy
- Then, in your config.js, reference the environment variable:
apiKey: process.env.OPENAI_API_KEY
- Customize Additional Parameters
- You can fine-tune your model’s behavior using the additionalParams property. This allows you to adjust settings like temperature, max tokens, and more:
- javascript
- Copy
additionalParams: {
  temperature: 0.7,
  max_tokens: 100,
  top_p: 1.0
}
- Save and Restart
- After making changes to your config.js file, save it and restart your Profound AI instance for the changes to take effect.
By properly configuring your models, you can tailor Profound AI to perfectly suit your business needs, whether you’re focusing on customer service, data analysis, or any other AI-driven application.
Embrace The Power of Profound AI:
Congratulations! You’ve not only installed Profound AI but also learned how to configure it to work with your preferred language models. This powerful combination of easy installation and flexible configuration puts the full potential of AI at your fingertips.
Explore the full potential of Profound AI at https://profoundlogic.com/ai/ and learn more about its features, including multi-model compatibility, dynamic agent guidance, and real-time data analytics capabilities, or check out Profound AI’s Top 25 FAQs here.
Have questions about Profound AI installation? Contact our team of experts: Futurization@ProfoundLogic.com or checkout our Profound AI Documentation.